Started work on re-making the seat for the poor unloved Hastilow saddle.
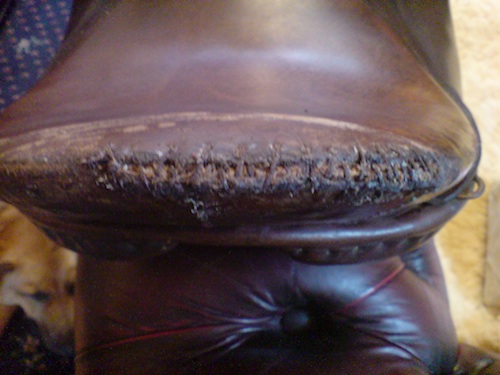
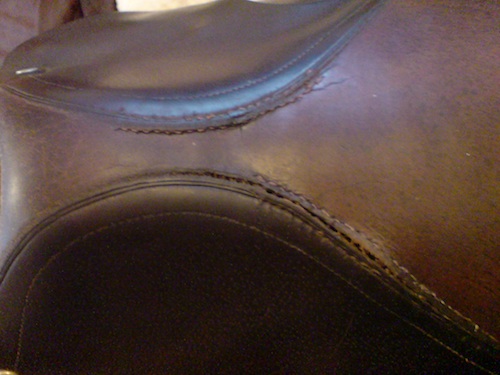
Just a reminder of how it looked:
![[linked image]](http://www.seaspiritoftheforest.co.uk/HastilowSaddle/Top.jpg)
![[linked image]](http://www.seaspiritoftheforest.co.uk/HastilowSaddle/Side.jpg)
![[linked image]](http://www.seaspiritoftheforest.co.uk/HastilowSaddle/Surgery1.jpg)
![[linked image]](http://www.seaspiritoftheforest.co.uk/HastilowSaddle/Surgery2.jpg)
![[linked image]](http://www.seaspiritoftheforest.co.uk/HastilowSaddle/MarkingPatternPuller.jpg)
![[linked image]](http://www.seaspiritoftheforest.co.uk/HastilowSaddle/PullersMarked.jpg)
![[linked image]](http://www.seaspiritoftheforest.co.uk/HastilowSaddle/PullersCut.jpg)
![[linked image]](http://www.seaspiritoftheforest.co.uk/HastilowSaddle/MarkingSeatPattern.jpg)
![[linked image]](http://www.seaspiritoftheforest.co.uk/HastilowSaddle/SeatPatternMarked.jpg)
![[linked image]](http://www.seaspiritoftheforest.co.uk/HastilowSaddle/SeatCut.jpg)
Next step is to measure and cut the welting for the top of the skirts (that's the tiny thin strip between the seat and the skirts of your saddle).
![[linked image]](http://www.seaspiritoftheforest.co.uk/HastilowSaddle/MeasureWelting.jpg)
.... then you just stitch it along the top! Piece of cake - the holes are already there in the skirt, and it's simple over-sewing. Not rocket science, lol!
![[linked image]](http://www.seaspiritoftheforest.co.uk/HastilowSaddle/WeltingStitched.jpg)
![[linked image]](http://www.seaspiritoftheforest.co.uk/HastilowSaddle/WeltingStitched2.jpg)
.... and I hope you're all taking notes, coz I shall expect you all to be able to do this fix on your own saddle if it needs it! (Save yourself a blinkin' fortune at the saddler's ......)
Next step: stitching the skirts to the freshly-cut pullers.
This is the run of stitching which so often comes apart. The reason it does that is that so many saddlery workshops cut one corner that really shouldn't be cut, and machine-stitch here! The problem with machine stitching is that if the thread goes in one place, then the whole lot is jeopardised. Machine-stitching skirts to pullers is a mortal sin which should (IMO) be punishable by hanging by a suitable dangly appendage until it gets torn off ........... And then being made to eat it.
![[linked image]](http://www.seaspiritoftheforest.co.uk/HastilowSaddle/SkirtStitchOutside.jpg)
![[linked image]](http://www.seaspiritoftheforest.co.uk/HastilowSaddle/SkirtStitchInside.jpg)
Next step:
You lay the new seat loosely over the top of the saddle, upside down, and make corresponding marks on the edge of the seat, and on the welting at the top of the skirt.
![[linked image]](http://www.seaspiritoftheforest.co.uk/HastilowSaddle/WeltingMarked.jpg)
Now comes stitching the seat to the skirts, right sides together. Again with a good rot-resistant thread, double thickness, and backstitch; using the same holes that the welting was stitched to the skirts. (And matching up the marks!)
The stitching has to be pulled tight or it will show on the outside when the seat is stretched onto the tree!
![[linked image]](http://www.seaspiritoftheforest.co.uk/HastilowSaddle/SeatStitching1.jpg)
![[linked image]](http://www.seaspiritoftheforest.co.uk/HastilowSaddle/SeatStitching2.jpg)
The tail end of the skirt gets sandwiched between the top and bottom parts of the seat leather, which is cut (only once ready to be stitched) along the line marked earlier from the original seat.
... and it's actually beginning to look recognisably like a saddle seat!
![[linked image]](http://www.seaspiritoftheforest.co.uk/HastilowSaddle/TailSandwich.jpg)
![[linked image]](http://www.seaspiritoftheforest.co.uk/HastilowSaddle/SeatFrontStitched.jpg)
![[linked image]](http://www.seaspiritoftheforest.co.uk/HastilowSaddle/DartStitchTop.jpg)
![[linked image]](http://www.seaspiritoftheforest.co.uk/HastilowSaddle/DartStitchBack.jpg)
![[linked image]](http://www.seaspiritoftheforest.co.uk/HastilowSaddle/DartsOutside.jpg)
The dart seams have to be flattened. It's important here to protect the leather of the seat so that you don't leave hammer-marks on it; I put it onto the soft side of a small piece of leather, on a bit of corrugated card, to protect it.
Pre-flatten by pressing the seam out (hard!) with a rounded piece of wood (the end of an awl handle is ideal).
![[linked image]](http://www.seaspiritoftheforest.co.uk/HastilowSaddle/DartsPre-Flatten.jpg)
![[linked image]](http://www.seaspiritoftheforest.co.uk/HastilowSaddle/DartsHammer.jpg)
![[linked image]](http://www.seaspiritoftheforest.co.uk/HastilowSaddle/DartsFlattened.jpg)
Remember how the seat had split at the waist in the original?
This happens when the seat leather is allowed to go dry and brittle, in combination with the strain of it being pulled down tight being taken on this leather.
You can't guarantee that the person who buys your saddle is going to keep the seat supple, but you <i>can</i> take some of the strain off it (trick I learned from Jim-Bob - I've never come across any other saddle with this adaptation).
Lay two pieces of girth web across the tree so that the front of the front web is just behind the rear webbing holding the girth straps, and mark them up following the line of the top of the skirts, and the edge of the tree.
![[linked image]](http://www.seaspiritoftheforest.co.uk/HastilowSaddle/StrainwebMarked.jpg)
They will overlap each other in the middle because of the curve of the seat. Mark the edge of the overlap, too. Then sew them together at the overlap.
Then line up the marks with the top of the skirt and where the edge of the tree will be, on the new pullers, lining up the front just behind where the girth straps will come, and tack the web roughly to the puller. It doesn't have to be pretty. When you stretch the seat down tight, the strain across the centre will be taken up by the strain webs, and won't go into the seat leather, so won't put it under too much tension, even if its new owner does neglect it .......
![[linked image]](http://www.seaspiritoftheforest.co.uk/HastilowSaddle/StrainwebSewn.jpg)
![[linked image]](http://www.seaspiritoftheforest.co.uk/HastilowSaddle/OldPoint.jpg)
Here are the new pieces needed, cut from old scrap leather; the D-shaped points have been cut from an old flap, and the outside pieces for the 'sandwich' have been cut from a gullet lining piece.
(The old point used as a pattern is in the centre.)
The edges of the thick D-pieces need to be shaved down to make the points slide more easily into the point pockets on the panel. It's quite possible to do this with a sharp knife, but I use an edging tool.
![[linked image]](http://www.seaspiritoftheforest.co.uk/HastilowSaddle/CuttingNewPoints.jpg)
![[linked image]](http://www.seaspiritoftheforest.co.uk/HastilowSaddle/EdgingNewPoints.jpg)
Stitch right around the edge, as well as a really solid triangle in the middle, then melt beeswax over all the stitches and hammer them down well, and get beeswax right along the edges, and rub in hard with (for example) the wooden awl handle.
Then soak with oil, coz it's old leather, and rub down really hard with a cloth.
![[linked image]](http://www.seaspiritoftheforest.co.uk/HastilowSaddle/PointMade.jpg)
Now we get ready to stretch and fit the seat (doing this all in one move, as the seat-leather wasn't stretched over earlier).
First the seat has to be really soaked in warm water, till the leather goes soft and stretchy. I'm stretching it by hand a bit extra where the top of the cantle will come - about 1.5cm above the top of the darts.
![[linked image]](http://www.seaspiritoftheforest.co.uk/HastilowSaddle/SoakingSeat.jpg)
Now the seat's stretchy, we start to tack it on. First a few tacks at the cantle (making sure it's centred!), then make sure the nail holes in the front of the skirt line up with the nail holes in the tree - I shove a nail through both and leave it there for the time being. Then pull tight and tack the quarters near the tail end of the skirt (again making sure the sides are pretty even!) Then fill in round the back.
Then pull the front ends tight, till the nails drop 'square' through the holes in the tree, and tack the fronts of the pullers under the front acrch of the tree.
![[linked image]](http://www.seaspiritoftheforest.co.uk/HastilowSaddle/Tacking1.jpg)
![[linked image]](http://www.seaspiritoftheforest.co.uk/HastilowSaddle/Tacking2.jpg)
![[linked image]](http://www.seaspiritoftheforest.co.uk/HastilowSaddle/Tacking3.jpg)
![[linked image]](http://www.seaspiritoftheforest.co.uk/HastilowSaddle/Tacking4.jpg)
![[linked image]](http://www.seaspiritoftheforest.co.uk/HastilowSaddle/Tacking5.jpg)
Then you tack the very front of the seat down under the front arch (making sure you turn under and tack down the loose ends of the welting on the way), and pull tight (hard!) and tack down the backs of the pullers.
Then you stretch the leather in the middle by .............. yup, you've guessed! Putting the saddle on the arm of the sofa and sitting on it, lol! Not the way they do it in the saddlery workshops, but then they're not re-seating, they're starting from scratch with someone else paying for the leather, so they pre-stretched a big piece of hide over the tree to start off with!
![[linked image]](http://www.seaspiritoftheforest.co.uk/HastilowSaddle/TackSeatFront.jpg)
![[linked image]](http://www.seaspiritoftheforest.co.uk/HastilowSaddle/TackWebs.jpg)
Then tack down along the bottom edge of the pullers ......
..... tack the pullers down (pulled down tight) under the skirts and to the front top of the tree .....
![[linked image]](http://www.seaspiritoftheforest.co.uk/HastilowSaddle/TackPullers.jpg)
![[linked image]](http://www.seaspiritoftheforest.co.uk/HastilowSaddle/TackPullerSides.jpg)
...... turn over and admire ...
... and leave it to dry out overnight.
![[linked image]](http://www.seaspiritoftheforest.co.uk/HastilowSaddle/SeatFromFront.jpg)
![[linked image]](http://www.seaspiritoftheforest.co.uk/HastilowSaddle/SeatFromBack.jpg)
Time to put new skirt nails in.
The leather around the nail holes has been seriously corroded (neglect!). Avoid this happening to your own saddle by cleaning around the skirt and flap nails thoroughly with a toothbrush to remove grit, sweat, oxidised metal etc., and dot with saddle oil regularly. Because the nail heads could pull through the holes, I'm making little 'washers' from bits of new panel hide. Then align the holes in the skirt and tree - push an awl through them - make a mental note of the angle they're at, and (after removing awl!) tap new nails gently through with a hammer, protecting the surface of the nail with a bit of leather.
Still protecting the nail-head, use a pair of grips the press the nail through really tightly, then clench the inside ends over really tight to the inside of the tree.
![[linked image]](http://www.seaspiritoftheforest.co.uk/HastilowSaddle/Corrosion.jpg)
![[linked image]](http://www.seaspiritoftheforest.co.uk/HastilowSaddle/WasherAndNail.jpg)
![[linked image]](http://www.seaspiritoftheforest.co.uk/HastilowSaddle/AlignHoles.jpg)
![[linked image]](http://www.seaspiritoftheforest.co.uk/HastilowSaddle/PressThrough.jpg)
![[linked image]](http://www.seaspiritoftheforest.co.uk/HastilowSaddle/ClenchOver.jpg)
![[linked image]](http://www.seaspiritoftheforest.co.uk/HastilowSaddle/SkirtNailIn.jpg)
Re-attaching the flaps:
The flap nail gets put in just the same as the skirt nail earlier. Then the front of the flap is lined up and tacked into position with two tacks, and the back is taked into position on the underneath and side of the tree, catching the stirrup bar guard in on the way to make it all neat.
![[linked image]](http://www.seaspiritoftheforest.co.uk/HastilowSaddle/FlapNailAndTacks.jpg)
![[linked image]](http://www.seaspiritoftheforest.co.uk/HastilowSaddle/FlapTackedUnderneath.jpg)
![[linked image]](http://www.seaspiritoftheforest.co.uk/HastilowSaddle/Front.jpg)
Then tack the centre underneath, and work from the centre out to the sides, giving it enough tacks! Remember not to tack too close to the piping, or it makes it very hard to stitch the panel on later
![[linked image]](http://www.seaspiritoftheforest.co.uk/HastilowSaddle/FrontTackEnds.jpg)
![[linked image]](http://www.seaspiritoftheforest.co.uk/HastilowSaddle/FrontTackUnderneath.jpg)
Now hunt around the scavenge-piles for a suitable piece of thin leather for lining the gullet. Upholstery leather is perfectly good enough for this. (Friends were throwing out a big leather sofa some years back, and we asked if we could strip the leather off it .......... still got some left!)
Cut a piece roughly to the right size, and then soak it till it's soft and stretchy.
![[linked image]](http://www.seaspiritoftheforest.co.uk/HastilowSaddle/LiningLeather.jpg)
Wipe the worst of the wet off the lining leather, then place a tack at the centre front and centre back, with a little bit of stretch in the leather. Then tack down, working symmetrically, and stretching the lining into place to remove any wrinkles..
Be kind to the next owner of the saddle (specially if it's you.......... lol!). Work on the assumption that they <i>are</i> going to want to clean their saddle properly, allow enough leather to line it, keep the tack heads well away from where the inside edges of the panel are going to be, and make sure they're well hammered down. Ideally nest them up against something that will stick out more than they do. Slicing your fingers open on protruding tack heads, while cleaning under the edges of your panel, is darned uncomfortable!
Then trim the surplus leather away neatly fairly close to the tacks.
Then leave it to dry.
![[linked image]](http://www.seaspiritoftheforest.co.uk/HastilowSaddle/LiningTacked.jpg)
![[linked image]](http://www.seaspiritoftheforest.co.uk/HastilowSaddle/MarkLacingHoles.jpg)
Then attach the panel again!
and............... ta-daaaaaaaaaaaaa! Whoop, whoop! Silly victory dance!
![[linked image]](http://www.seaspiritoftheforest.co.uk/HastilowSaddle/FinishedLeft.jpg)
![[linked image]](http://www.seaspiritoftheforest.co.uk/HastilowSaddle/FinishedRight.jpg)
![[linked image]](http://www.seaspiritoftheforest.co.uk/HastilowSaddle/FinishedTop.jpg)